Add a Delivery Phone number field to Woocommerce Checkout

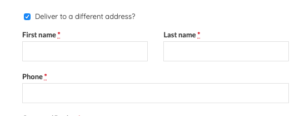
If you need a customer to be able to add seperate billing and delivery phone numbers (for example when having a product sent as a gift) you can achieve this by adding the code below to your theme’s functions.php file


/**
Add an extra Phone number field to the Delivery Address checkout.
 */

add_filter( 'woocommerce_checkout_fields', 'bbloomer_shipping_phone_checkout' );
 
function bbloomer_shipping_phone_checkout( $fields ) {
   $fields['shipping']['shipping_phone'] = array(
      'label' => 'Phone',
      'required' => true,
      'class' => array( 'form-row-wide' ),
      'priority' => 25,
   );
   return $fields;
}
  
add_action( 'woocommerce_admin_order_data_after_shipping_address', 'bbloomer_shipping_phone_checkout_display' );
 
function bbloomer_shipping_phone_checkout_display( $order ){
    echo '<p><b>Shipping Phone:</b> ' . get_post_meta( $order->get_id(), '_shipping_phone', true ) . '</p>';
}

Display Woocommerce Attributes on Product pages

Want to display a list of your product attributes on your product page? For example show the Manufacturer, Dimensions etc. Just add the code below to your themes functions.php file.

If you want to change exactly where on the product page the attributes are displayed update the priority of the hook. (Thats the 25 in the last part of the code).

/**
Add list of Attributes to product page.
 */


function cw_woo_attribute(){
    global $product;
    $attributes = $product->get_attributes();
    if ( ! $attributes ) {
        return;
    }

    $display_result = '';

    foreach ( $attributes as $attribute ) {


        if ( $attribute->get_variation() ) {
            continue;
        }
        $name = $attribute->get_name();
        if ( $attribute->is_taxonomy() ) {

            $terms = wp_get_post_terms( $product->get_id(), $name, 'all' );

            $cwtax = $terms[0]->taxonomy;

            $cw_object_taxonomy = get_taxonomy($cwtax);

            if ( isset ($cw_object_taxonomy->labels->singular_name) ) {
                $tax_label = $cw_object_taxonomy->labels->singular_name;
            } elseif ( isset( $cw_object_taxonomy->label ) ) {
                $tax_label = $cw_object_taxonomy->label;
                if ( 0 === strpos( $tax_label, 'Product ' ) ) {
                    $tax_label = substr( $tax_label, 8 );
                }
            }
            $display_result .= $tax_label . ': ';
            $tax_terms = array();
            foreach ( $terms as $term ) {
                $single_term = esc_html( $term->name );
                array_push( $tax_terms, $single_term );
            }
            $display_result .= implode(', ', $tax_terms) .  '
';

        } else {
            $display_result .= $name . ': ';
            $display_result .= esc_html( implode( ', ', $attribute->get_options() ) ) . '
';
        }
    }
    echo '
';
    echo $display_result;
}

add_action('woocommerce_single_product_summary', 'cw_woo_attribute', 25);

How to move position of Customize button – Fancy Product Designer

If you are using the Fancy Product Designer wordpress plugin and need to move the  location of the “Customize Product” button I will show you how.

Find the file called class-frontend-product.php, it lives in the inc/ folder of the plugin.

Find the code below:

//add customize button
add_action( ‘woocommerce_single_product_summary’, array( &$this, ‘add_customize_button’), 25 );


The wordpress codex shows how this add_action() function works:

<?php add_action( $hook, $function_to_add, $priority, $accepted_args ); ?>


The $priority variable (set as 25) is what determines where the customise button is echoed out on the product page.

  • To display the Customize button above the product title change the priority from 25 to 1
  • To display the Customize button just below the product title and price change the priority from 25 to 10


How To Allow Additional Upload File Types in WordPress

how-to-add-mime-types-wordpress
Many file types you may want to upload to your WordPress blog or site will not be allowed by default. This is down to security concerns; uploading incorrect files etc that could bring down the site or introduce vulnerabilities. If you know what you are doing here is how to unlock any file type you want.

Don’t feel comfortable editing core files? Have a look through the plugins available.

A list of the default allowable file types for uploading is available here.

  1.  Find the functions.php within the folder: wp-includes/
  2.  Scroll down to the function: function wp_get_mime_types() {}
  3. Add a new line in the appropriate section, or the MISC section if you are unsure. For example, for adding the XML file type, insert the following line:‘xml’ => ‘application/xml’,Once you saved/uploaded you will be able to upload XML files within WordPress.List of all MIME types explained available here.


You may also want to take a look at How to Increase Your WordPress Memory Limit

Contact Form 7 – Redirect to Thank You Success page

Instead of using the default success message in the Contact Form 7 WordPress Plugin you may wish to redirect users to a customised thank you / success page. This can be useful for showing extra information, tracking leads etc.

Create the Contact Form 7 Redirect…

  1. Login to WordPress and Select Contact Forms from the sidebar
  2. Select the contact form you want to change and click edit
  3. Scroll down to Additional Settings at the bottom of the page
  4. Enter the code as below, replacing the url with your own!

on_sent_ok: “location = ‘http://www.example.com/thank-you/’;”

Contact Form 7 Additional Settings

How to increase PHP memory limit for wordpress

If you run into a problem where your wordpress page is coming up blank or timing out there is a good chance the PHP memory is timing out. Have a look in your server’s error.log file and you might see something like the following

[08-Sep-2014 12:35:06 UTC] PHP Fatal error:  Allowed memory size of 50331648 bytes exhausted (tried to allocate 7680 bytes) in /home/...

A quick way of fixing this without going near the php.ini file is by going to the wp-config.php file and entering the following:

define('WP_MEMORY_LIMIT', '64M');

selectnav.js – how to set default title

selectnav.js is a handy jquery tool used for transforming a <ul> list into a select menu. Generally for a resonsive mobile friendly view.

Available here: https://github.com/lukaszfiszer/selectnav.js/

By default it has an empty title which can be a little confusing for users. To give the menu a title do the following…

Find the following code in your selectnav.min.js file

<select id="'+l(!0)+'">

Add the following directly afterwards, without whitespace.

<option disabled="disabled" selected="selected">Choose one</option></select>

Remove wordpress admin bar in versions 3.0 +

If you are using any of the newer versions of WordPress you may miss having the functionality to let you turn of the admin bar that hovers on the top once you are logged in. I personally prefer this off as it tends to throw off the look of your design as you are working on it.

Head over to your theme’s functions.php

Enter the following code after all the important code is initialised:

add_filter(‘show_admin_bar’, ‘__return_false’);